Tutorial
20 Minute Class
The class objective (goal) is to give tips and
suggestions for better MLS pictures. This is a 20 minute class - meaning you should be able
to finish in 20 minutes. I recommend about 10 minutes to finish the
outline on this page, and another 10 minutes to go over the comprehensive
example. There is an optional final exam at the end.
The class is free.
Introduction:
- The subject of this class is the one primary MLS photo.
- The photo at the top of your MLS listing says a lot about you.
- How much effort/energy/money did you invest in the photo of your
smiling face that appears on your business card?
- The first impression of your property is the MLS photo.
- Take a minute to look at this actual example
from MLS.
Camera Set Up
(Not all cameras use the same terminology. My camera is Kodak LS443
with dock. You may need to refer to the
user guide for your camera).
- Keep your battery charged.
-
Exposure Metering = Center Weight (this is very important)
- Image Size - I use the medium setting which produces an image of 1,800
x 1,200 pixels. The file size varies - about 700 KB. I
recommend you set your camera to at least 800 x 600 pixels.
- On Camera File Storage = Anything that is not internal memory is OK
- I use an MMC/SD Card which gives me a capacity of about 120 pictures.
- When I turn the camera on, I use auto mode i.e., point & shoot.
- Zoom Lens - I (usually) use the default = max wide angle
- Everything else is idiot proof - I leave it alone
Artistic Considerations
- Close the garage door, and remove all "clutter" (the best driveway is
an empty driveway).
- If there is a trash can in front of the house, move it out of the
picture.
- A rainy day can be a good day for a picture. Snowy day is always
bad. Soft light is better than a bright day with intense light.
You have no control of the light - all you can do is come back at some
other time.
- Time of Day - You want the light (sun) at your back.
- Time of Year - Spring is best. Autumn and
summer are both good. Winter is the worst season for MLS photos.
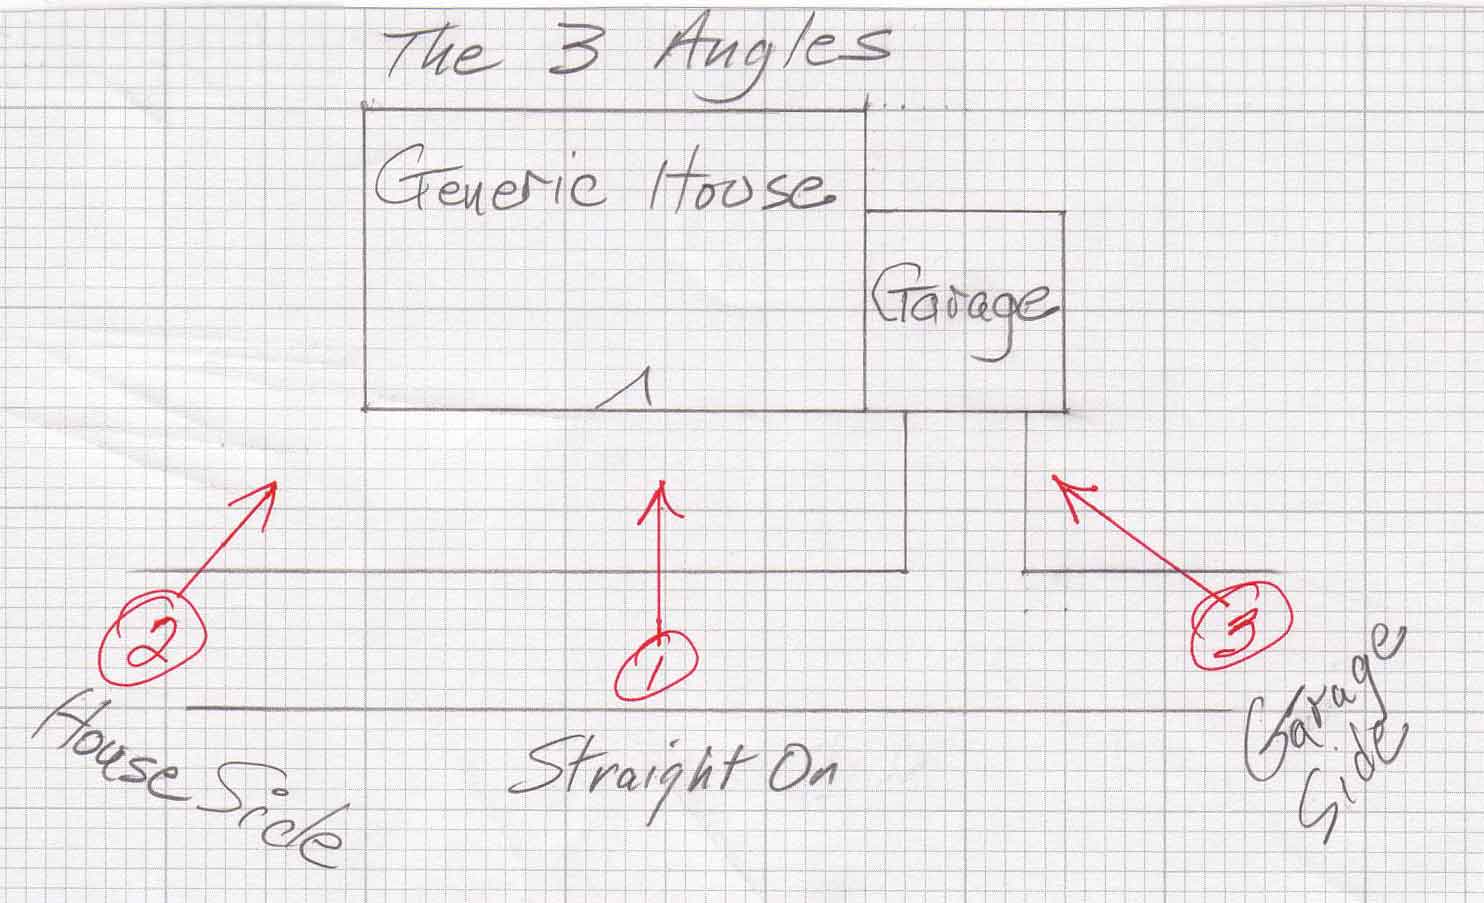
- Where? Proper distance from the subject (house). Start
near the house and walk backwards until you can just barely get the entire
house in the photo - then take 2 more giant steps backwards (literally,
not figuratively).
- Where? Get at least one photo from each of the
3 angles.
Dark Room
- You must crop.
- I use the
Photoshop crop tool. I recommend that you do too.
Photoshop
is high tech and expensive. It will require a few hours of learning
curve.
-
Kodak Easy Share is free, easier to learn, and will allow you to
produce an acceptable end result.
- Crop according to your MLS
aspect ratio.
With Photoshop you can get it exactly right. With Kodak EasyShare, you
will have to settle for "close enough". Aspect ratio is determined (set)
by your MLS. Denver MLS is 448 x 290 pixels (129,920 total pixels)
for an aspect ratio of 1.5448:1. In Massachusetts, the MLS file is
512 x 400 pixels (204,800 pixels) for aspect ratio of 1.28:1
(Massachusetts is more like a square, less like a rectangle). This
does make a difference. You need to
get this part right.
- Optimize (reduce) image size and file size. Keeping the file
size small will save you time uploading. If you submit a file that
is too big, MLS will change it for you. Your best option is to
submit a file that MLS will accept with no changes.
- It's OK if your file size is a little too big. It's never OK for
your file size to be too small.
- Leave everything else alone.
- Take 10 minutes to study the comprehensive example
File System Considerations
- Never lose or modify the original file - always work on a copy
- Transfer and copy from the camera to your computer right now while
you are thinking about it.
- Keep your camera memory card tidy/clean.
Marketing
- Make a periodic (careful and critical) review of your listings -
including the MLS photo.
- Update (replace) your MLS photo for improved market appeal.
- A system that generates good MLS
photos costs no extra money and very little extra effort.
- Bad MLS photos
(including the dreaded no-photo) may damage your reputation and act as a
"referral repellant".
- Your good photos will generate word of mouth and Internet referrals
- for your property and for you.
- As an example - read this quote from the Hewlett Packard
(HP) Website:
Phil Hoover, a real estate agent in Boise, has used digital photography
technologies to create a powerful competitive advantage over his
competitors. "Despite being a relative newcomer to the Boise market, I
have built a deep level of name recognition," says Hoover. "I recently
had a seller who called all seven offices in our region to find me and
list his home with me.
Final Comments:
- The single most important thing you can do to improve your MLS photos
is to pay attention - if you are reading this it means you are already 87%
of the way there.
- In order to wind up with 1 good picture -- take 6. Experiment
and test. Compare the results. Select the best.
- You can do this.
Are you interested in generating referrals for yourself? Take a minute and look at the alumni page.
This is an easy and effective way to generate positive publicity for yourself
and a link to your Website. I urge you to take the exam and submit your
answers via email. You can do this. It costs nothing, and it just
might work.
|
